ラベル Linux の投稿を表示しています。 すべての投稿を表示

2013年12月20日金曜日

絵付きで解説! - SSH公開鍵認証 「TeraTermとPagentの連携」

Tera TermでPagent(+PuTTYgen)を使う

部室にあるサーバーのSSH認証方式を、公開鍵認証に変更しました。
これで都度のパスワード入力から開放されます。( ´∀`)エヘヘ セキュリティ強化もあり万々歳ですね。
メインとして使っているSSHクライアントはTeraTermなので、今回はこれにPagentを連携させてやります。
Windows 7で作業しました。

  Login As...

[tanaka@centos5.8 ~]$ echo "文字による表現が下手なので今回は絵付きで解説"

鍵生成ダイアログの表示

まずは、公開鍵と秘密鍵をTeraTermで作成します。
TeraTermを起動したら、「設定」から「SSH鍵生成(N)」をクリックして、鍵生成のダイアログを開いて下さい。
鍵生成ダイアログの表示


鍵生成の準備

ダイアログが表示されたら、ダイアログの右上にある「生成(G)」というキャプションのボタンを押します。
ダイアログ下部にある「公開鍵の保存(C)」と「秘密鍵の保存(P)」のボタンが有効になったことを確認して下さい。
鍵生成の準備


公開鍵の生成と保存

ボタンが有効になったら「公開鍵の保存(C)」のボタンを、鍵のパスフレーズを未入力のまま押します。
id_rsa.pubというファイル名で保存して下さい。(・ω・´)
公開鍵の生成と保存
(今回はC:\Users\Owner\SSH鍵というディレクトリを作成して保存しました)


秘密鍵の生成と保存

最後に秘密鍵を作成します。
先ほど押したボタンの右にある「秘密鍵の保存(P)」のボタンを、今度は鍵のパスフレーズを入力してから押します。
ここで入力したパスワードを忘れないで下さい。
このパスワードは、いつも使っているアカウントのログインパスワードとは別でOKです。
秘密鍵の生成と保存
(今回はC:\Users\Owner\SSH鍵というディレクトリを作成して保存しました)


秘密鍵の変換 (PuTTYgen)

Pagent読み込めるようにするために、先ほど作成した秘密鍵をPuTTYgenで変換します。
PuTTYgenを起動して秘密鍵を読み込んで下さい。 秘密鍵の生成と保存 1
秘密鍵を読み込むと、作成した秘密鍵のパスワードを入力するダイアログが表示されます。
作成時のパスワードを入力してOKOK秘密鍵の生成と保存 2
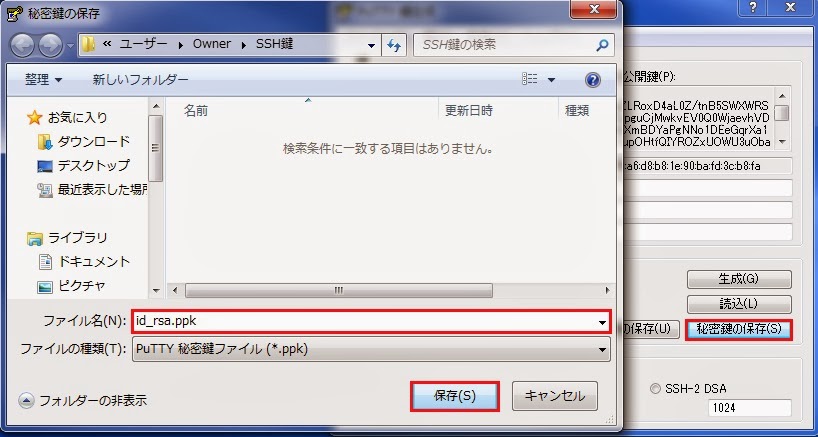
最後に変換された秘密鍵を保存して終了です。
保存する鍵の名前はid_rsa.ppkにしました。
秘密鍵の生成と保存 3


公開鍵の転送 (サーバーへの送信)

先ほど作成した公開鍵を、TeraTermを使って対象のサーバーへ送信します!
対象のサーバーに公開鍵認証をさせたいユーザーでログインしてください。 (`・ω・´)

サーバーにログインをしたら、TeraTermのメニューバー項目「ファイル」にある「SSH SCP」をクリックします。
すると、ファイルを送信できるダイアログが出てくるので、ダイアログ上側に表示されているファイル選択(参照)ボタンの「...」を押して、今回の公開鍵を選択。
選択したら、右にある「send」ボタンを押せばOKです。
公開鍵の転送 (サーバーへの送信)


公開鍵の設置

クライアントで作成した公開鍵をサーバーに設置します。
.sshというディレクトリを、ユーザーのホームディレクトリ直下にパーミッション700で作成します。
  (既に.sshディレクトリが存在する場合はこの作業は不要です。)
そして、公開鍵のデータをauthorized_keysというファイルに追記して下さい。
authorized_keysファイルのパーミッションは600です。
ファイルやディレクトリのパーミッションに気をつけて下さい。

今回、わたしはtanakaユーザーで作業しました。

.sshディレクトリをユーザーのホームディレクトリにパーミッション700で作成 (ディレクトリが存在しない場合)
[tanaka@centos5.8 ~]$ mkdir -m 700 .ssh

さきほどクライアントPCからTeraTermで送信した公開鍵を.sshディレクトリに移動
[tanaka@centos5.8 ~]$ mv id_rsa.pub ./.ssh/

公開鍵をauthorized_keysに追記 (ファイルが存在しない場合は作られます)
[tanaka@centos5.8 ~]$ cat ./.ssh/id_rsa.pub | tee -a ./.ssh/authorized_keys
ssh-rsa AAXXXXXXXyc2EAAAABIwAAAQEAotQXRRRRRbGPEoKkzigYxaX7jBYE2qvZEAAEEEEEMyLV5NvpHL+qcPHftBP3j1emHHHHH
EiCCCC3NmTViP2wFEEEEEh95BIK+BAfcTmiDMzhX1ouSNHg3e0WUvTJ/TxAJn6pHzHLVY6NtmBknskpSqFL1vUVi5/7uqa2dakphrwe
YKKwVqFDdj/HIE2pIbc3haZG9sBtnfYKn8X0d8qq1J28DuGFUWbxMjgVNSoUvfyRgzIzhzt4duEUof+cbQDt3u+geUU0EAbOoAhbziQ
Sl0Q== clientname

authorized_keysのパーミッションが600でない場合は600に変更
[tanaka@centos5.8 ~]$ chmod 600 ./.ssh/authorized_keys

不要になった公開鍵を削除
[tanaka@centos5.8 ~]$ rm -i ./.ssh/id_rsa.pub
rm: remove 通常ファイル `./.ssh/id_rsa.pub'? y


sshd_configの編集

sshd_configに設定された次の3つの項目(値)を確認して下さい。
noになっていたり、未指定だった場合は設定してあげて下さい。

[tanaka@centos5.8 ~]$ sudo vi /etc/ssh/sshd_config
~中略~
RSAAuthentication yes
PubkeyAuthentication yes
AuthorizedKeysFile      .ssh/authorized_keys

パスワード認証を禁止する場合は次のように設定!

PasswordAuthentication no

sshd_configの編集が終わったら、sshdを再起動です。
サーバー側の準備が出来たらログアウト!

いよいよパスワード無しでの接続。
クライアント側でPagentを起動します。(起動するとタスクトレイに入っていると思います。)
起動したら鍵の読み込みボタンを押してダイアログを開きます。
先ほどPuTTyGenで変換した秘密鍵(ppkファイル)を指定して下さい。
(この時も秘密鍵作成時のパスワードを入力する必要があります)
Pagentの起動と秘密鍵の指定
セットが完了したら、あとはログインを実行してみるだけ。c(・ω・`c⌒っ
TeraTermを起動したらPagentを使うというラジオボタンにチェックを入れて、OKボタンを押すだけです。
TeraTermでPagentを使う


Last login: Thu Dec 31 23:59:59 2013 from 192.168.1.105
[tanaka@centos5.8 ~]$

無事にログイン出来ました!!!ヽ(´▽`*)ノ

今回お世話になったサイト


2013年12月9日月曜日

phpのタイムゾーンエラー (警告)

Unknown: It is not safe to rely on the system's timezone settings. (in Unknown on line 0)

phpで次のような警告(タイムゾーン)が出ている(事後発覚)場合があります(した)。

PHP Warning:  Unknown: It is not safe to rely on the system's timezone settings. You are *required* to use the date.timezone setting or the date_default_timezone_set() function. In case you used any of those methods and you are still getting this warning, you most likely misspelled the timezone identifier. We selected the timezone 'UTC' for now, but please set date.timezone to select your timezone. in Unknown on line 0

タイムゾーン設定がされていない場合ですね。
早速、タイムゾーンの設定をして荒ぶるphpさんを黙らせたいと思います。

ではでは、まずは現状の確認から。

[root@centos5.8 ~]# php -i | grep timezone
Default timezone => UTC
date.timezone => no value => no value

php.inidate.timezoneえいじあーとおきょおおおおおおおおう(Asia/Tokyo)を指定してApacheを再読み込みで。

[root@centos5.8 ~]# vi /etc/php.ini
; Defines the default timezone used by the date functions
; http://php.net/date.timezone
;date.timezone =               ← コメントアウトを解除して
date.timezone = Asia/Tokyo     ← Asia/Tokyo を追記しました

今回のわたしの環境はPHP5.4でしたので、こちらの方の記事を知識の参考とさせて頂きました。ヽ(´▽`*)ノ

わたしの方では検証していませんが、他サイトさん(こことかここ)の情報によれば、timezoneの設定で日付を扱うphp関数の速度が結構違うみたいですね。

2013年12月8日日曜日

CentOS 5.8 にリポジトリを追加する。 (epel, remi, rpmforge, CentALT)

CentOS5(x86_64)にepel, remi, rpmforgeのリポジトリを追加する。

CentOS5.8(x86_64)のサーバーにepel, remi, rpmforgeのリポジトリを追加(更新)しました。


epel

[root@centos5.8 ~]# rpm -Uvh http://ftp-srv2.kddilabs.jp/Linux/distributions/fedora/epel/5/x86_64/epel-release-5-4.noarch.rpm
http://ftp-srv2.kddilabs.jp/Linux/distributions/fedora/epel/5/i386/epel-release-5-4.noarch.rpm を取得中
警告: /var/tmp/rpm-xfer.5Qjih2: ヘッダ V3 DSA signature: NOKEY, key ID 217521f6
準備中...                ########################################### [100%]
   1:epel-release           ########################################### [100%]


remi

[root@centos5.8 ~]# rpm -Uvh http://rpms.famillecollet.com/enterprise/remi-release-5.rpm
http://rpms.famillecollet.com/enterprise/remi-release-5.rpm を取得中
警告: /var/tmp/rpm-xfer.oGYntL: ヘッダ V3 DSA signature: NOKEY, key ID 00f97f56
準備中...                ########################################### [100%]
   1:remi-release           ########################################### [100%]


rpmforge

[root@centos5.8 ~]# rpm -Uvh http://apt.sw.be/redhat/el5/en/x86_64/rpmforge/RPMS/rpmforge-release-0.5.2-2.el5.rf.x86_64.rpm
http://apt.sw.be/redhat/el5/en/i386/rpmforge/RPMS/rpmforge-release-0.5.3-1.el5.rf.i386.rpm を取得中
警告: /var/tmp/rpm-xfer.R6dKsb: ヘッダ V3 DSA signature: NOKEY, key ID 6b8d79e6
準備中...                ########################################### [100%]
   1:rpmforge-release       ########################################### [100%]


CentALT

[root@centos5.8 ~]# rpm --import http://centos.alt.ru/repository/centos/RPM-GPG-KEY-CentALT

[root@centos5.8 ~]# rpm -Uvh http://centos.alt.ru/repository/centos/5/x86_64/centalt-release-5-3.noarch.rpm
http://centos.alt.ru/repository/centos/5/x86_64/centalt-release-5-3.noarch.rpm を取得中
準備中...                ########################################### [100%]
   1:centalt-release        ########################################### [100%]

NOKEYって警告貰っちゃいました。
警告を消す場合は、4つめののようにrpm --importRPM-GPG-KEYを取得してください。

リポジトリの選択は--enablerepoで指定するので enable=1 の設定は 0 に変更しました。

[root@centos5.8 ~]# sed -i "s/^enabled=1/enabled=0/" /etc/yum.repos.d/rpmforge.repo /etc/yum.repos.d/epel.repo /etc/yum.repos.d/remi.repo

またはviで直接

[root@centos5.8 ~]# vi /etc/yum.repos.d/centalt.repo
[CentALT]
name=CentALT Packages for Enterprise Linux 5 - $basearch
baseurl=http://centos.alt.ru/repository/centos/5/$basearch/
enabled=0
gpgcheck=0
~

ついでにyumdownloaderを入れて

[root@centos5.8 ~]# yum install yum-utils
Loaded plugins: fastestmirror, security
Loading mirror speeds from cached hostfile

~中略~

Running Transaction
  Installing     : yum-utils                                                                                        1/1

Installed:
  yum-utils.noarch 0:1.1.16-21.el5.centos

Complete!

一丁上がり! ∩(´∀`)∩ワァイ♪

2013年11月28日木曜日

Ubuntu 12.x Postfixとmailコマンドのインストール

Postfixのインストール

下記の例では、apt-getコマンドを使用してPostfixをインストールしています。

root@Ubuntu12:~# apt-get install postfix
Reading package lists... Done
Building dependency tree
Reading state information... Done
The following extra packages will be installed:
  ssl-cert
Suggested packages:
  procmail postfix-mysql postfix-pgsql postfix-ldap postfix-pcre sasl2-bin dovecot-common postfix-cdb mail-reader postfix-doc openssl-blacklist
The following NEW packages will be installed:
  postfix ssl-cert
0 upgraded, 2 newly installed, 0 to remove and 65 not upgraded.
Need to get 1,287 kB of archives.
After this operation, 3,278 kB of additional disk space will be used.
Do you want to continue [Y/n]? Y
Get:1 http://jp.archive.ubuntu.com/ubuntu/ precise-updates/main ssl-cert all 1.0.28ubuntu0.1 [12.3 kB]
Get:2 http://jp.archive.ubuntu.com/ubuntu/ precise-updates/main postfix i386 2.9.6-1~12.04.1 [1,274 kB]
Fetched 1,287 kB in 1s (1,021 kB/s)
Preconfiguring packages ...
~中略~
/etc/aliases does not exist, creating it.
WARNING: /etc/aliases exists, but does not have a root alias.

Postfix is now set up with a default configuration.  If you need to make
changes, edit
/etc/postfix/main.cf (and others) as needed.  To view Postfix configuration
values, see postconf(1).

After modifying main.cf, be sure to run '/etc/init.d/postfix reload'.

Running newaliases
 * Stopping Postfix Mail Transport Agent postfix   [ OK ]
 * Starting Postfix Mail Transport Agent postfix   [ OK ]
Processing triggers for libc-bin ...
ldconfig deferred processing now taking place
root@Ubuntu12:~# /etc/init.d/postfix status
 * postfix is running

mailコマンドのインストール (mailutils)

root@Ubuntu12:~# mail -s "Mail Testing" user@ubuntu.xxx
The program 'mail' is currently not installed.  You can install it by typing:
apt-get install mailutils

標準では、mailコマンドが存在しないのでインストールします。
mailコマンドは、mailutilsから取得出来ます。
apt-getまたはaptitudeコマンドでインストールして下さい。

root@Ubuntu12:~# apt-get install mailutils
Reading package lists... Done
Building dependency tree
Reading state information... Done
The following extra packages will be installed:
  guile-1.8-libs libgsasl7 libltdl7 libmailutils2 libmysqlclient18 libntlm0 mysql-common
Suggested packages:
  mailutils-mh
The following NEW packages will be installed:
  guile-1.8-libs libgsasl7 libltdl7 libmailutils2 libmysqlclient18 libntlm0 mailutils mysql-common
0 upgraded, 8 newly installed, 0 to remove and 65 not upgraded.
Need to get 3,153 kB of archives.
After this operation, 11.5 MB of additional disk space will be used.
Do you want to continue [Y/n]? Y
Get:1 http://jp.archive.ubuntu.com/ubuntu/ precise/main libltdl7 i386 2.4.2-1ubuntu1 [38.1 kB]
Get:2 http://jp.archive.ubuntu.com/ubuntu/ precise-updates/main mysql-common all 5.5.34-0ubuntu0.12.04.1 [13.3 kB]
Get:3 http://jp.archive.ubuntu.com/ubuntu/ precise-updates/main libmysqlclient18 i386 5.5.34-0ubuntu0.12.04.1 [922 kB]
Get:4 http://jp.archive.ubuntu.com/ubuntu/ precise/main guile-1.8-libs i386 1.8.8+1-6ubuntu2 [755 kB]
Get:5 http://jp.archive.ubuntu.com/ubuntu/ precise/universe libntlm0 i386 1.2-1 [18.4 kB]
Get:6 http://jp.archive.ubuntu.com/ubuntu/ precise/universe libgsasl7 i386 1.6.1-1 [133 kB]
Get:7 http://jp.archive.ubuntu.com/ubuntu/ precise/universe libmailutils2 i386 1:2.2+dfsg1-5 [872 kB]
Get:8 http://jp.archive.ubuntu.com/ubuntu/ precise/universe mailutils i386 1:2.2+dfsg1-5 [401 kB]
Fetched 3,153 kB in 2s (1,212 kB/s)
Selecting previously unselected package libltdl7.
(Reading database ... 51954 files and directories currently installed.)
Unpacking libltdl7 (from .../libltdl7_2.4.2-1ubuntu1_i386.deb) ...
Selecting previously unselected package mysql-common.
Unpacking mysql-common (from .../mysql-common_5.5.34-0ubuntu0.12.04.1_all.deb) ...
Selecting previously unselected package libmysqlclient18.
Unpacking libmysqlclient18 (from .../libmysqlclient18_5.5.34-0ubuntu0.12.04.1_i386.deb) ...
Selecting previously unselected package guile-1.8-libs.
Unpacking guile-1.8-libs (from .../guile-1.8-libs_1.8.8+1-6ubuntu2_i386.deb) ...
Selecting previously unselected package libntlm0.
Unpacking libntlm0 (from .../libntlm0_1.2-1_i386.deb) ...
Selecting previously unselected package libgsasl7.
Unpacking libgsasl7 (from .../libgsasl7_1.6.1-1_i386.deb) ...
Selecting previously unselected package libmailutils2.
Unpacking libmailutils2 (from .../libmailutils2_1%3a2.2+dfsg1-5_i386.deb) ...
Selecting previously unselected package mailutils.
Unpacking mailutils (from .../mailutils_1%3a2.2+dfsg1-5_i386.deb) ...
Processing triggers for man-db ...
Setting up libltdl7 (2.4.2-1ubuntu1) ...
Setting up mysql-common (5.5.34-0ubuntu0.12.04.1) ...
Setting up libmysqlclient18 (5.5.34-0ubuntu0.12.04.1) ...
Setting up guile-1.8-libs (1.8.8+1-6ubuntu2) ...
Setting up libntlm0 (1.2-1) ...
Setting up libgsasl7 (1.6.1-1) ...
Setting up libmailutils2 (1:2.2+dfsg1-5) ...
Setting up mailutils (1:2.2+dfsg1-5) ...
update-alternatives: using /usr/bin/frm.mailutils to provide /usr/bin/frm (frm) in auto mode.
update-alternatives: using /usr/bin/from.mailutils to provide /usr/bin/from (from) in auto mode.
update-alternatives: using /usr/bin/messages.mailutils to provide /usr/bin/messages (messages) in auto mode.
update-alternatives: using /usr/bin/movemail.mailutils to provide /usr/bin/movemail (movemail) in auto mode.
update-alternatives: using /usr/bin/readmsg.mailutils to provide /usr/bin/readmsg (readmsg) in auto mode.
update-alternatives: using /usr/bin/dotlock.mailutils to provide /usr/bin/dotlock (dotlock) in auto mode.
update-alternatives: using /usr/bin/mail.mailutils to provide /usr/bin/mailx (mailx) in auto mode.
Processing triggers for libc-bin ...
ldconfig deferred processing now taking place
root@Ubuntu12:~# mail -s 'Email Testing' user@ubuntu.xxx
Cc:
Null message body; hope that's ok